Kimchi Tofu

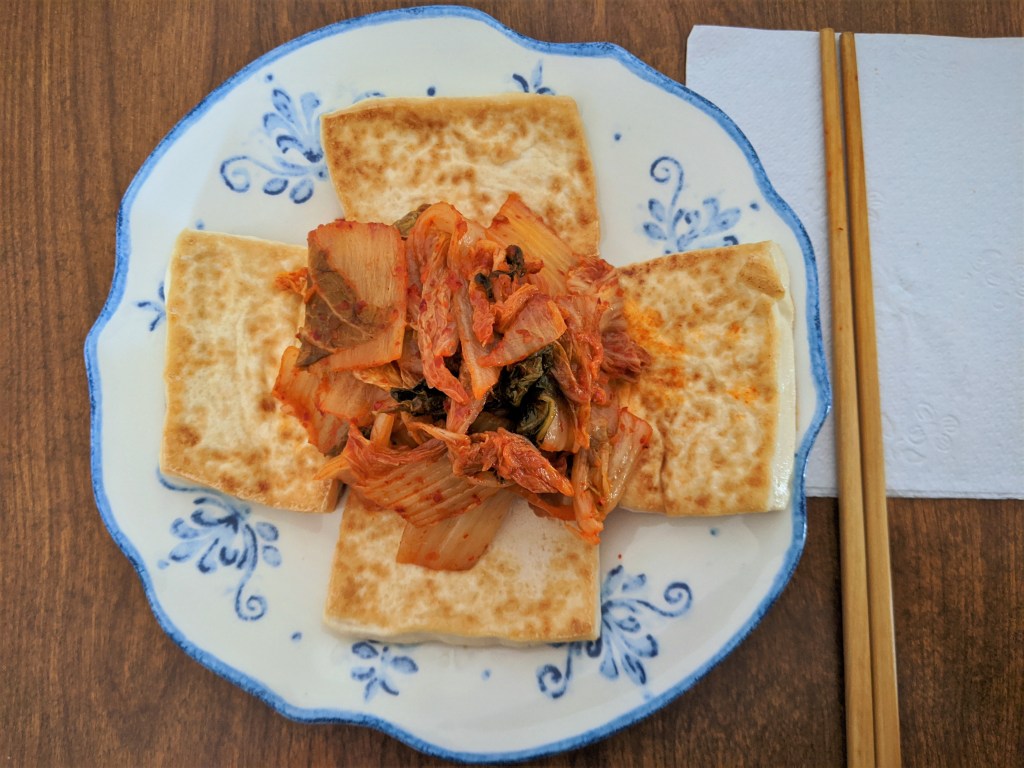
Crispy and golden, yet delectably soft tofu holding up a spoonful of aromatic and spicy kimchi, it’s the perfect bite for a night in.

Sometimes at the beginning or end of the day, you scour the pantry and fridge just trying to figure out what to eat. There must be some treasure at the back of the fridge, right? On these particular days, I find making tofu + kimchi the perfect dish for a lazy or worn out soul.

Nowadays, fermented foods are taking the world by storm. New food fads, diets, or just plain ol’ adventurous eater will encounter sauerkraut, kimchi, or natto. There are many health benefits that come with eating these types of foods, but I won’t get into that. I’ll leave it up to you and this informative book to aid you into further learning.

Back to the main star for tonight, pan fried tofu with stir fried (or refrigerated) kimchi is the perfect combination in any season, meal, and event. This dish can be easily made at any time of the day and provides satisfaction all the way!

Essentially what happens in this dish is lightly pan frying the tofu slices until they’re crispy on the outside then tossing the kimchi in the pan afterwards to soften and enhance the flavors of the cabbage. And that’s it! A quick and simple side dish to accompany your lunch or dinner, or maybe a simple plate for a quiet afternoon.

(2 servings; Time-20 minutes)

You’ll need:

  • 1 package of firm tofu
  • 1 cup of kimchi
  • salt
  • oil
  • sesame seeds (optional)
  • sesame oil (optional)
  1. Drain the package of tofu and cut the tofu into slices (8-12 slices, depending on the package).
  2. Pat dry on a plate and sprinkle salt on both sides. Leave for 5 minutes.
  3. Drain the tofu again, being cautious not to break the tofu!
  4. Heat up a pan and add 3 tablespoons of oil.
  5. Add tofu slices into the pan, making sure the tofu slices are coated with oil on the bottom.
  6. The tofu will start to turn color on the bottom, signaling that it is browning up to a wonderful crisp, about 3-4 minutes. Flip over when golden.
  7. Cook on the other side.
  8. After the tofu is done, arrange on a plate and let it rest.
  9. Add 1 tablespoon of sesame oil and 1 table spoon of neutral oil into the pan.
  10. Add in the kimchi, fry up until fragrant and translucent.
  11. When you see the kimchi is softened, arrange onto the same plate as the tofu. Sprinkle on some sesame seeds.
  12. Eat!

The variations on this is that you can also add in other vegetables with the kimchi to make it a more robust and filling dish. Kimchi can also be eaten straight from the jar or box, so you can fry up the tofu and add on fresh kimchi if you are in a hurry.

This is a good vegetarian option for those who are looking for a Meatless Monday, or want to slowly adopt a vegetarian lifestyle, without leaving out the spices or taste. If tofu is the foundation of this dish, then kimchi is the main topper for this, but you need both for it to work out. Many people have a nice bowl of steaming rice on the side and maybe a few pieces of roasted seaweed for a complete meal. Whatever way you decide to mix and match, I’m sure it’ll come out wonderfully!

Hope this post was helpful and please leave any questions/comments below~

Red Bean Buns

Ah, finally a bread post! I’ve been waiting so long for this, but my indecisiveness was holding me captive. Today, I’ll share some tips and tricks for making red bean buns, Asia’s most popular bread!

Sold just about anywhere in bakeries, red bean buns come in all shapes and forms. In Japan, they’re called AnPan (あんパン), just like the famous superhero Anpanman. Koreans have 단팥빵 and 찐빵, where the difference is baked or steamed buns. 豆沙包 is the best in China and is also called 紅豆包. There are so many variations, it would take forever to get to through all of them!

The way I made my red bean buns is having an easy milk bread base and adding in red bean paste. I like having a shiny golden top, so I baked mine. I found it especially easy to have a base that you can build on as well as simple enough to make with limited ingredients. I adapted my milk bread from Woman Scribbles and I will put the link at the end of the post.

Beans, beans, beans! Red bean paste is super hard to make and I don’t think I would ever have the patience to do it. If you want to learn more about it, the movie An (あん), is an amazing movie and you can learn about the process of making red bean paste. So, my alternative is supermarket canned red bean paste! I do have to say though, some of them are a lot sweeter than the ones in Asia, so spoon wisely. I make the bread a little less sweet so that it isn’t as overwhelming.

To sum it up easily, I made the milk bread, bought canned red bean paste, and spooned them in before baking them.

Red Bean Buns

  • 2/3 heavy cream (you can substitute this with 2/3 milk and two tbsp of butter)
  • 1 cup milk
  • 1 large egg
  • 1/3 cup sugar
  • 4 cups flour
  • 1 tbsp yeast
  • 1 & 1/2 tsp salt
  • egg wash (1 egg & 1 tbsp milk)
  • 1 can red bean paste
  • optional: sesame seeds
  1. Combine the milk and cream in a bowl and microwave for 30 seconds.
  2. In a bowl, add together the milk+cream, egg, sugar, flour, yeast, and salt.
  3. Mix together; it will be sticky and get all over your hands, but after a few minutes it will come together.
  4. Knead for 15 minutes, or put it in a bread machine.
  5. Set in a warm place for around an hour, or until it doubles in size.
  6. Grease pans while they are proofing.
  7. After rising, knock back (or excitedly punch down) and knead for a few minutes.
  8. Roll the dough out and make around 12-13 even rolls.
  9. Open the can of red bean paste.
  10. Flatten out the rolls and spoon in red bean paste (just about 1 or 1&1/2 tbsp). (Think of it like making dumplings.) Close them up and pinch the top, roll them around to make it round and place the sealed top down.
  11. Divide into pans and cover for 30-60 minutes.
  12. Preheat to 350F/176C.
  13. Make the egg wash and brush on top of the buns.
  14. Bake for 23-25 minutes, or when the buns are golden and the bottoms are lightly browned.
  15. Cool them on a rack and eat!
  16. **Optional: put sesame seeds on top after egg wash.

Milk bread is really soft already, so it makes for a good covering for the soft red bean paste. This recipe is also fool proof for me; I’ve made it at least 5 times already and they come out to be perfect and the same every time.

The dough is also very moist and sticky and will definitely stick to your hands. My only tip is to keep kneading and punching that dough. After a few minutes it will come together and form a nice ball to knead. Also refrain from adding additional flour because it will harden the dough and it will come out stiffer.

Other recipes also call for tapioca flour, cake flour, or other additions, so be creative!

The recipe I have adapted this from is https://www.womanscribbles.net/milk-bread/

Go and check out her website, it’s amazing! Also, if anyone had any additional tips or comments, please put them down below! I would love to hear about about it.